
Fixing a corrupt vhdx file manually
Recently, I've had a corrupted VHDX file that has not been able to mount or repair using regular tools ("The file or directory is corrupted and unreadable"). This guide describes the steps that fixed it.
Recently, we had a customer that had a corrupted virtual disk file (vhdx). The file itself had 60TB in size and contained business relevant data.
Trying to start the associated virtual machine failed and logged the following error:
Fehler beim Abrufen der Datenträgerinformationen.
(english version: Failed to get the disk information.)"VM-NAME": Die Anlage "C:\mount\Bulldozer-VD-0\VM-Name\data.vhdx" konnte aufgrund des folgenden Fehlers nicht geöffnet werden: "Die Datei oder das Verzeichnis ist beschädigt und nicht lesbar." (7864368) (ID des virtuellen Computers: DB431ADB-6744-4DF8-BAFC-F62286FDCE7E).So, getting error message The file or directory is corrupted and unreadable might make you feel a little uncomfortable, because the chances of fixing this are quite low.
Trying to mount the disk manually showed also an error:

Depending if you know this error you might know that it's a very bad starting point for a fix. In my case, I didn't want to give up on it and try to get it fixed.
On the way for the fix
There have been a few assumptions I've been able to make:
- Despite the disk is 60TB in size, it's a fixed size VHDX - therefore i excluded the whole "data section" of the disk, so it doesn't really matter if it is 512MB or 60TB in size, the metadata is where to search
- Due the fact that the file itself is fixed size, the host filesystem (ReFS) can be (with high confidence) be taken out of focus, especially as no other file had any issue
My approach has been to use a hex editor and go through the file to see if there's an option to verify the structural integrity of the file and maybe the contained framing (like disk and partition headers).
Getting information about vhdx file format
Luckily, Microsoft provides a documentation of the VHDX file format: [MS-VHDX]: Virtual Hard Disk v2 (VHDX) File Format | Microsoft Docs.
A copy of the file is attached here (source: https://winprotocoldoc.blob.core.windows.net/productionwindowsarchives/MS-VHDX/[MS-VHDX].pdf)
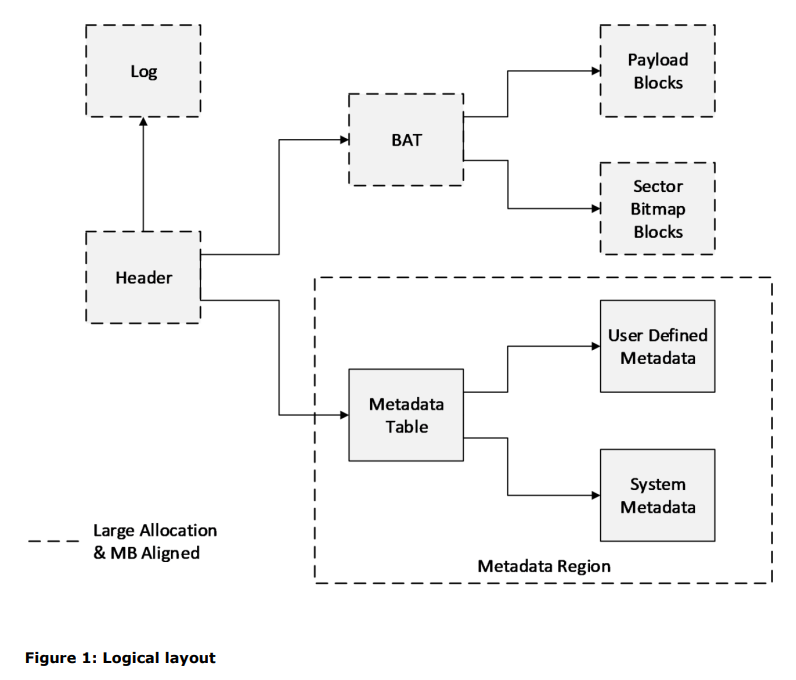
This document describes the format quite well and allows us especially to understand what sections are relevant in first place:
- Headers (two of them)
- Logs
Other sections like metadata are also present, but these do change very rarely - so no good candidates.
The logical overview looks just like this:
Another very good helper tool is vhdxtool (https://systola.com/blog/14.01.2015/VhdTool-Is-Dead-Long-Live-VhdxTool/), as it extracts metadata fast and easily, which saves tons of time compared to calculating all checksums and searching together required data yourself.
Checking the integrity of the file
Having the documentation available, I've been checking on different sections of the file manually (which is actually quite time consuming in the first place). As hex-editor I'm using 010Editor (https://www.sweetscape.com/010editor/) as it's quite handy and provides some nice tools that help on analysis.
Header sections
The best starting place is obviously the VHDX header to get basic information about the disk. The header looked like this in the current state.
68 65 61 64 FE BD 54 15 3C 00 00 00 00 00 00 00
CF DD 10 CA ED B4 11 EC 87 04 05 07 18 B8 85 13
CF DF 73 06 ED B4 11 EC 87 04 05 07 18 B8 85 13
8A C0 98 0A 24 98 20 4D B6 23 DA E6 7B 3A 79 2F
Checksum looks good (be aware it's CRC32-C). According to the documentation, it references a log entry (8A C0 98 0A 24 98 20 4D B6 23 DA E6 7B 3A 79 2F) which sounds like it might have been affected by a dirty shutdown.
Log sections
So, as we know that the header is referencing a log section, we can now navigate to the log section.
6C 6F 67 65 DC 5C D4 EA 00 10 00 00 00 00 00 00
8D 5C 32 03 65 1E 06 5E 00 00 00 00 00 00 00 00
8A C0 98 0A 24 98 20 4D B6 23 DA E6 7B 3A 79 2F
00 00 30 41 FA 3C 00 00 00 00 30 41 FA 3C 00 00
Decoding this also looks good in general, checksum matches. The only thing that makes me (without having a deep understanding of the VHDX format) skeptic is, that the number of entries in the log is zero.
So I've been looking for several hours back and forth to see if there's a way to either understand the purpose and related actions of this log fully or to just bypass is (just to not replay it).
A final confirmation that the issue is related to the log entry came from qemu-img
.\qemu-img.exe check  'C:\mount\Bulldozer-VD-0\VM-Name\data.vhdx'
C:\tools\qemu-img-win-x64-2_3_0\qemu-img.exe: Could not open 'C:\mount\Bulldozer-VD-0\VM-Name\data.vhdx': VHDX image file 'C:\mount\Bulldozer-VD-0\VM-Name\data.vhdx' opened read-only, but contains a log that needs to be replayed.  To replay the log, execute:
 qemu-img check -r all 'C:\mount\Bulldozer-VD-0\VM-Name\data.vhdx': Operation not permitted
qemu-img can be used to work with different virtual disk image formats, including VHDX. So it's a handy tool to get some information. In this case it tells us, that a log needs to be applied. Unfortunately, trying to replay the log didn't work then:
.\qemu-img.exe check -r all 'C:\mount\Bulldozer-VD-0\VM-Name\data.vhdx'
C:\tools\qemu-img-win-x64-2_3_0\qemu-img.exe: Could not open 'C:\mount\Bulldozer-VD-0\VM-Name\data.vhdx': Could not open 'C:\mount\Bulldozer-VD-0\VM-Name\data.vhdx': Invalid argumentTL;DR - Tell me how to fix it
Depending if you read the text above, you might now know something about the origin of the corruption or to what it's related, but not how to fix it. And you're here for the fix I guess!
So - here are the steps that I applied to fix the issue:
- Get a copy of one of the two headers (I selected the first one as it had the lower sequence number, offset 0x1000 in my case)
- Zero the Log GUID from the copied header (offset 0x48, length 16 bytes)
- Adjust the sequence number to be higher than the current active header number (so that our header becomes the active one). If in doubt you have good chances by just incrementing the current sequence number twice.
- Update the checksum (be aware: the four bytes of the checksum are zero while building the checksum)
- Now go back to the actual corrupted file and replace the section from where you've copied the header data and replace it with our custom one
The copied header section looks somehow like this:
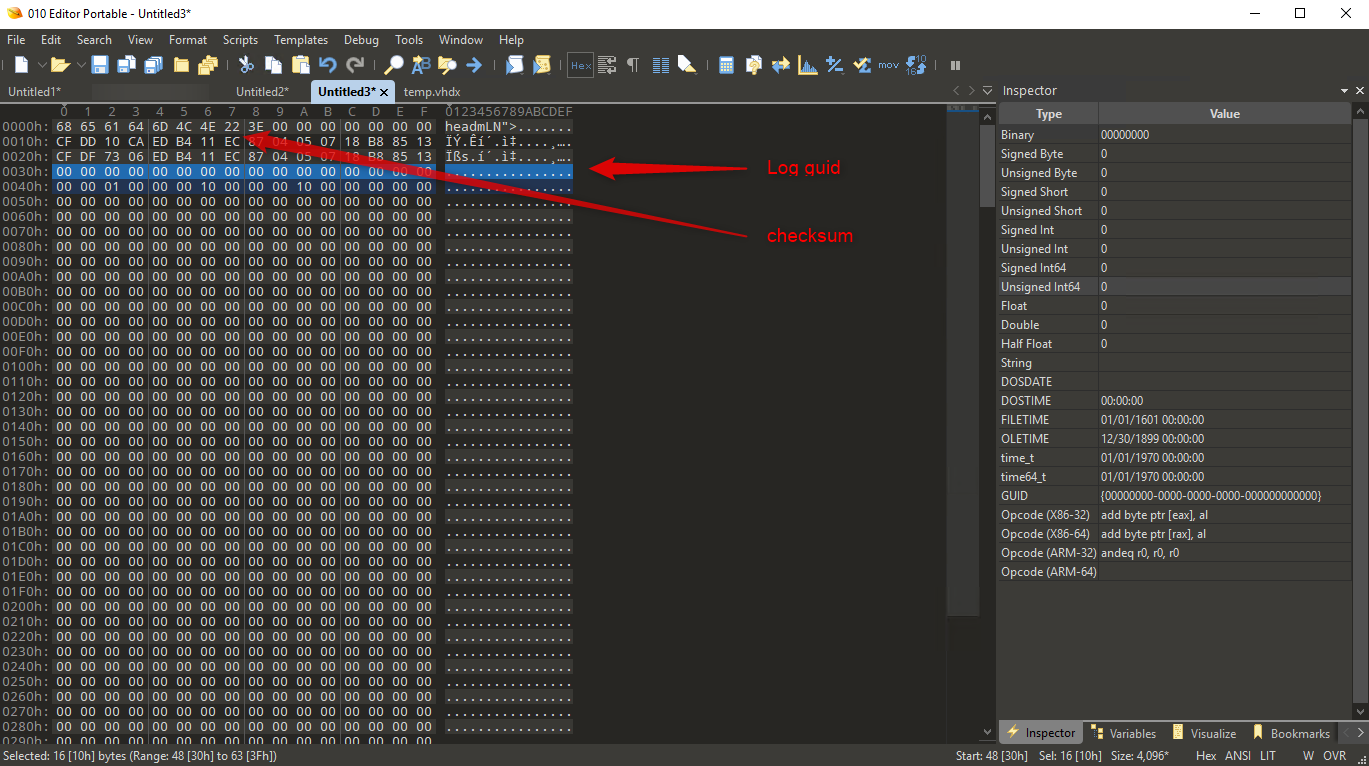
The important part is marked: log guid is zeroed and checksum needs to be updated.
Having applied this very little patch solves yet the full corruption of the file so that it can be mounted right away. In my special case the filesystem had no issue at all, which makes me quite happy.