
Adding storage to a ceph cluster
Ceph is meant to store data. A natural requirement therefore is to add data to the cluster in order to provide the cluster the ability to actually store data. This article describes how to add storage to your existing cluster.
Ceph is meant to store data. A natural requirement therefore is to add data to the cluster in order to provide the cluster the ability to actually store data. This article describes how to add storage to your existing or newly created cluster. If you've not yet created a cluster, check out this guide https://blog.nuvotex.de/setting-up-a-ceph-cluster/
The first step when adding storage is to add an OSDs which are used to map drives into the ceph rados.
What are OSDs?
An OSD (object storage daemon) is a component within ceph architecture which is used to abstract disk devices and provide an interface to add them to the ceph rados.
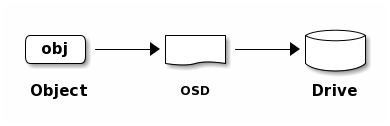
For each disk device an OSD daemon will be created.
When you've already added storage to your cluster, you may list existing OSDs.
# ceph osd status
ID  HOST              USED  AVAIL  WR OPS  WR DATA  RD OPS  RD DATA  STATE
 0  nuv-dc-apphost1  2528M  61.5G      0        0       0        0   exists,up
 1  nuv-dc-apphost2  2528M  61.5G      0        0       0        0   exists,up
2 nuv-dc-apphost3 2528M 61.5G 0 0 0 0 exists,upIn this case we've three OSDs that are quite idle as there is no I/O right now.
If you want to go deeper, check out ceph osd metadata - this will show OSD detail data.
Adding new OSDs
As state above, adding storage means adding OSDs. Adding a new OSD is quite simple as shown in the next snippet.
ceph orch daemon add osd nuv-dc-apphost1:/dev/sdb
ceph orch daemon add osd nuv-dc-apphost2:/dev/sdb
ceph orch daemon add osd nuv-dc-apphost3:/dev/sdbThis will add new storage to your cluster and listing osds (ceph osd status) will include the newly added daemons.
Setting device class
If you're using SSD devices, you might need to manually specify the device class for the new OSDs.
# set OSD device class for osd.0 to SSD
ceph osd crush set-device-class ssd osd.0

# if already set, remove the device class before
ceph osd crush rm-device-class osd.0Reuse existing drives
If you're adding a disk that has been used (at least partitioned) before, ceph will require that you clear (zap in ceph jargon) the device before.
This can be done using ceph orch.
ceph orch device zap <HOST> <DEVICE> --force

# clear devices
ceph orch device zap nuv-dc-apphost1 /dev/sdb --force
ceph orch device zap nuv-dc-apphost2 /dev/sdb --force
ceph orch device zap nuv-dc-apphost3 /dev/sdb --forceIt's propably quite clear that this command is destructive and will destroy data on the devices. Recovery data after zapping the wrong device might be a time consuming (if feasable) task.
Having cleared your devices, you might just proceed with the steps above when adding them as storage by adding OSDs.
Rebalancing data
If you're adding OSDs to an existing setup and you want to rebalance existing data, you can just use the ceph balancer.
Check out if balancer is already enabled and has a mode assigned (ceph balancer status).
# ceph balancer status
{
    "active": false,
    "last_optimize_duration": "0:00:00.000422",
    "last_optimize_started": "Fri Nov 27 15:54:16 2020",
    "mode": "none",
    "optimize_result": "Unable to find further optimization, or pool(s) pg_num is decreasing, or distribution is already perfect",
    "plans": []
}This shows that the balancer is currently off and has none as mode (= no mode at all). Let's enable the balancer
ceph balancer mode upmap
ceph balancer onLet's check the status again.
# ceph balancer status
{
    "active": true,
    "last_optimize_duration": "0:00:00.000456",
    "last_optimize_started": "Fri Nov 27 15:57:11 2020",
    "mode": "upmap",
    "optimize_result": "Unable to find further optimization, or pool(s) pg_num is decreasing, or distribution is already perfect",
    "plans": []
}Fine - balancer is up and running! This will rebalance out data automatically for us.
Next step is to create a pool which will actually provide access to your data. I'll cover this in one of the next articles.


